

• Easy DIY Wood Easter Eggs •


DIY Wood Easter Eggs-
•Includes FREE svg, dxf, pdf & eps cut files for you to use to finish your eggs.
Choose your favorite pastel or bright paint colors to paint your eggs. Our wood eggs come in 3 different sizes…
- Things you will need:
~ MDF Wood Egg from LilyRoseDesignsCo
Get your Wood Easter Egg here.... Click here!
~ Digital Cutting file (svg, dxf, eps) to use on a cutting machine (Cricut or Silhouette)
Download here…
Click here to get Easter Egg FREE Svg file
~ Vinyl
~ Acrylic Craft Paint (Like Apple Barrel, Ceramcoat, Americana, or DecoArt) -Found at any Craft Store
~ Sandpaper
~ Sponge Brush
~ Something to put your paint on (like a Paper Plate)

Step 1: Start by putting a small amount of paint on your paper plate. Use this paint to start painting the edges of your wood egg. I have found that a sponge brush works well.

Step 2: After the edges have been painted, I then paint the front of my egg. Once the edges and the front have been painted, wait a few minutes for them to dry.

Step 3: Once the sides and top are dry, I then paint the back of the egg. At this point I also add another coat of paint to the front of the egg, if needed.
Because our wood cutouts are 3/4" thick, they can easily stand up on their own. After painting the back and the 2nd coat on the front, I stand up the wood cutout so that both sides can dry. One thing I love about Acrylic Craft paint is the drying time... it dries super fast.
Repeat these steps for all of your Easter Eggs. Until they are all painted and dry.
Step 4: There are so many possibilities and different ways to finish your Easter Eggs. If you would like to make eggs similar to the ones I have pictured, feel free to use the cutting file that is available in this blog post. It is easy and simple to cut these designs on colored vinyl with a Cricut or Silhouette cutting machine and then apply them to your painted eggs.


Step 5: Download the Cutting file that I have provided for you…(svg, dxf. eps & pdf files) ~ It includes a chevron pattern, polka dot pattern and flower with lines pattern ~
Download the file here.... Click here!
You will need to re-size the designs to fit on the size of egg that you have.
Cut out the vinyl designs.
Using transfer tape, apply these designs to your eggs.


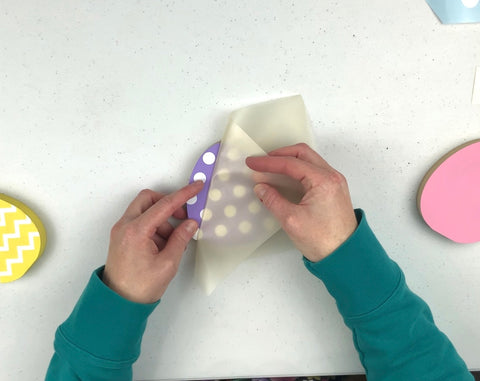


STEP 6: I like to use a piece of sandpaper to sand the front edge on the side of my wood crafts… especially when I have vinyl hanging off of the sides. By brushing the edges softly with the sandpaper, it will gently trim the vinyl right off the edge. This is an easy & simple way to trim the vinyl to the exact size.


STEP 7: Then the final step… I like to spray my crafts with a Clear Wood Finish Lacquer Spray to protect the painted finish. You can find a spray at your local Hardware Store, Home Depot or Lowes.
So cute!! and Easy!!

~ Visit LilyRoseDesignsCo.com today for these wood eggs and more!
~ Click here to sign up for our Newsletter. You will be notified of new items and get a coupon code to use at checkout.
~ Don't forget to grab your FREE digital files! You can use the svg, dxf, eps or ai to cut out vinyl or paper to decorate your eggs.
Click here for your Free Easter Egg Designs Svg
Use the images below to pin this item to your Pinterest if you would like to remember where you found this tutorial and to help my website to grow in followers.... Thank you!

